Showing posts with label Vacation. Show all posts

Thursday, April 18, 2013

Feb. 18- March 3 (Includes Vacation Week)

Vacation week!  Oh, how I miss you and your colors and sunshine and happiness.....


As I mentioned earlier this week, I look at this project as a place for summary, not big details.  I will do some regular scrapping of this trip - I love chances to scrap vacations - so what I did here was just a summary of the week.  Maybe it will help me later when I want to get to the scrapbooking project, too.


Left page - just some favorite 3x4 pictures.  The "vacation" stickers are on top of the plastic. 


On the right is a 6x6 insert where I used another weekly calendar for some brief notes of the week.


On the back of the insert is a picture of us, with me holding a spider monkey.  Actually, it was more that the spider monkey was holding me.  I did a brief post about it here.  Moment of a lifetime, I tell ya.  Anyway, I used the WordFoto app to add a word overlay on that picture before printing it, just for an extra fun look. 


I also added this envelope within this week just to hold some cards from my birthday and Junior's boarding report cards (which, by the way, I don't believe for a second).

I have one more page that's empty and not pictured.  I think I'll just do a collage there, but I'm waiting until I fix the page in the other side of the protector - the left page of the next week:


The week after vacation: Possibly the most grey, boring week of the year. It looks about like I felt that week.  I have to say - this week was kind of a dud. I am committed to keeping this project a weekly project, and this week made me question that commitment. I had just 3 pictures - none of them that great - and nearly zero to say. But I managed to put together some notes and fill the pages, and I guess sometimes that's all that matters.

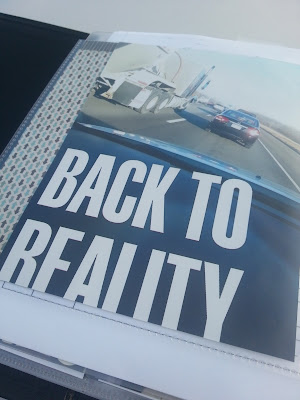
I didn't notice that my 5x7 print of Monday morning traffic was cut off at the bottom until I actually finished the page.  I plan to get a new print the next time I place an order.


I added the "back to reality" text with the Aviary app and placed it on a point on the picture that was dark and useless, so it was a great spot for the text.


A couple of notes for the week was all I could scrape together. I stole this grey card from my new Jade Project Life kit. I'm going to use that kit not for Project Life but for a project with Crystal's childhood pictures. It's something we have meant to do for years, and I really want to get it done this summer. The fun part of putting pictures in the divided protectors and making it pretty - that's what I'd like to dive into. But first we have to SCAN all those pictures. Yuck! Anyone have any tips on how to make that project less painful? Let me know!

This weekend I'll be back with two current Project Life weeks, and then next week I'll dive into the rest of March. Before this month is over, I'll have all of 2013 caught up and posted and can get started on some other projects like the one mentioned above. I'm ready!

Wednesday, February 27, 2013

Post-Vacation High: Bring on March!

We're back from our vacation to Mexico.  It had its highs.....
Hello down there, Gulf Coast!
 And it had its lows:

 But the highs definitely win!
Used a few scrap supplies to decorate my Bubba mug for the week.  This one happened to be full of Miami Vice.
 But that vacation high really wears off quickly, doesn't it?  I'm already tired of being back to work, the weather stinks, there's no one to bring me drinks/food on demand,  and I don't have much motivation to catch up on much of anything around the house. Boo hoo.
Ugh.....back to work stinks!

A public shout out to Crystal, though, who stayed home from work because she didn't feel good on Monday and Tuesday but went ahead and did all our laundry and suitcase clean-out anyway.  That's called "being a trooper" around our house, and she was definitely a trooper.  

And here we are, about to start another month......I think I need some blog goals to lift my spirits and to keep me busy for the coming weeks:

  • I left off with some Instagram and app related posts earlier this month.  I will get back to posting about more app uses in March.  I actually just loaded a couple more options to my phone and iPad, so I may have some success stories to share there, too.
  • I almost exclusively used my phone for this trip's pictures.  I'm anxious to dig in and start a project with them, but I think I'll wait a bit.  I'm not doing a big giant album - I feel like I just finished last year's trip.  And I don't have nearly the volume of pictures that I usually have.  So I need some time to plot and plan how I want to tackle this project.
  • After getting caught up on several project life weeks, I now need another round of catch-up.  I'd like to stop "catching up" by the end of March so I can finish the last few months of the project in real time.  I think it's an obtainable goal!
I also plan to share some travel stories throughout the month as I play with the pictures.  Like the one about my spider monkey bite.
No, really, I got bit by a spider monkey! That's a story that will never get old for retelling. The one in my arms above was not the biter, though.  This one climbed up in my arms to cuddle, and she made the cutest grunting noise that's apparently the equivalent to a cat's purr.....amazing life moment!

Tomorrow I'll be back with a special Master Forger project, and then Friday with a new March kit. So bring on March......a little looking forward, a little looking back, and probably a lot of living in the moment!

Friday, January 18, 2013

Completed Summer Vacation Album - Finger Lakes 2012

Happy Weekend!

I have some friends coming to visit this weekend, and I'm really looking forward to some fun.  I haven't seen them since our vacation in August, and we have some things to catch up on.  And if nothing else, since my scrap room is also my guest room, it was good motivation to clean!

I had a goal of completing the album for that summer vacation before this visit, and I'm happy to report that I made it. I've shown some of the pages here in the past few months, but here's the whole album in order, if you're interested.


Album on Flickr


Sigh.....now if only our weather could be as nice this weekend as it was during our summer trip.  Oh well, I think we'll find some fun, anyway.

I had no intention of making an entire album for the week, but that's what it became - the album is nearly stuffed.  I usually have one album for a year, maybe an extra album for a special vacation or project.  I don't do mini albums or projects, so everything goes in the "big book."  To put it in perspective: In 2010 I used 2 albums, one for the year and one for a vacation.  In 2011 I used 2 albums, one for the year and one for a December Daily.  For 2012 I will end up with 6-7 albums:

--Two 12x12s for the year
--One 8 1/2 x 11 for February's Mexico vacation
--One 12x12 for this vacation album from August
--One project life 6x8
--One December Daily 6x8
That's crazy!  And really I should put my Week in the Life project into its own album, but I just stuffed it into one of the 12x12s.  It's definitely out of the ordinary for me, and I don't want to end up with that many albums EVERY year, but apparently it was a big year for scrapping.

Maybe I'll simplify and do everything 12x12 this year (other than my current project life pages) - I don't know, we'll see.

Have a super weekend!

Wednesday, January 16, 2013

Counterfeit Kit Pages

Today I'm finally posting some pages created with my January Counterfeit Kit. And before I get to the pages, I wanted to mention info about the CKC blog this month:
  • Be sure to link something to this month's Mr. Linky! There's an extra incentive - Cassie owns an awesome scrappy store on Etsy called Paper Issues, and she is sponsoring a $20 Paper Issues gift certificate to one random winner from all those who add to the Mr. Linky.The winner will be drawn at the end of the month.  So get your projects linked up for your change to win! 
  • Watch for this month's blog hop on January 25th. It's too late to join the hop, but please join us for some inspiration.
OK, so on to the pages......

I needed to fill the back side of a page protector (cut down from an 8x10 protector). I just used things from my kit (except some scraps and a piece of kraftstock) to fill this awkward space.


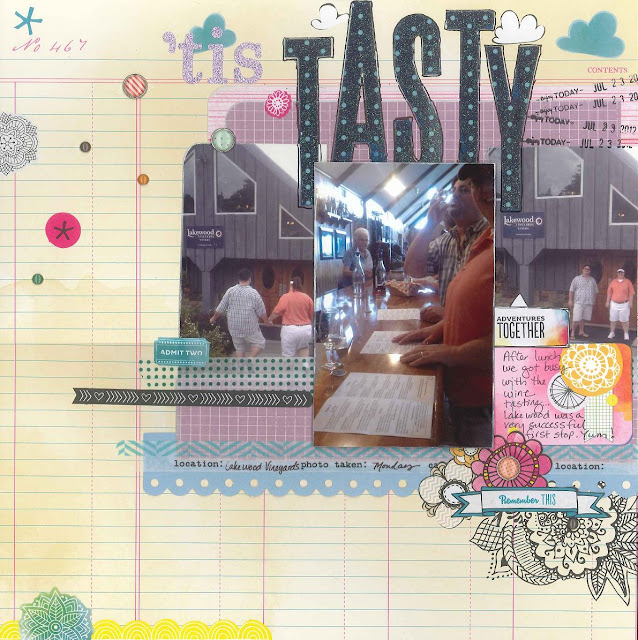
I think this next page ended up being one of my favorites of the book. I just love the flower picture. We ate outside on the patio with that beautiful view of the vineyard and lake, just a really nice place to be.  I  like how the colors on the page added to the colors of that picture: 


And I couldn't show three pages today without including the dog, could I? 


Again, mostly items from my kit. The sticker sentiments in my kit didn't have what I needed, so I covered the saying in the middle and used it for the background of my title.


I used Stickles to hide the not-so-great edges of that oval I cut to cover the sticker.  It also worked to hold those tiny little letter stickers in place. These little sticker letters are so cute, but the adhesive is never really very good, is it? I decided to name the phenomenon - Alphabet Drift.  Ever see it?  You spell a word, turn around, and find the letters have drifted - down the page, up your arm, across the desk, etc.  Alphabet Drift. Look it up - I bet it's in the dictionary.


I used a Zig Glue Pen in spots across the page, and then sprinkled sequins over the sticky spots.  Pretty simple way to use loose sequins, as long as you don't mind the work of corralling those little boogers back into the jar.  After my experience, my work with sequins may be short lived.

I don't know if it's my kit, the new year, the cold weather, or the pending visit of friends, but I suddenly feel the draw of my scraproom like I haven't felt in quite awhile. Wish I could bottle the motivation I'm feeling right now.

Tuesday, December 4, 2012

Words Can Come Back to Bite You.....

Yesterday I mentioned that we're going back to Mexico this winter.

You know how a character in a movie will promise to be a good person or become a nun if she can just live to see another day?  Well, I have to refer you back to a post I wrote earlier this year, where I made a statement about the idea of going on vacation and what I would give if we could just make it happen again this winter.  Do you see it?


Yea. Words can come back to bite you......

So, it's time to go on my own little scrap shopping hiatus for a few months.  I'll be scrapping with just what I have in my stash while eating oodles of noodles, with the heat set on 62 degrees, but the reward is oh so worth it! 


I am often the first to roll my eyes when I see people proclaim a scrap-diet, usually because one of the next messages is something like, "I just got this little thing today," or, "it was on sale so it doesn't count, who could pass it up!"  I don't want to be one of those people.  So I mean it - no shopping, none, until the end of March when I go to the Memories Expo.

Fortunately, I know I can count on all of you Counterfeiters to keep me inspired and on track with the stash busting!

Monday, December 3, 2012

Counterfeit Kit Guest Post and Completed Mexico Album

My second guest post on the Counterfeit Kit blog is up today, and I talk about how I make kits work for my scrapping process. 

I'm really excited to say that I've completed the project I talked about in yesterday and today's posts.  My Mexico album is finished, and you can see all the pages here.


Between my Fresh Starts page kit and other items in my stash I was able to finish the few remaining pages in the pile.


I've decided to move this group of pages to its own 8 1/2 x 11 album. I was going to add them to my 12x12 2012 album, but it just seemed like too many smaller pages to stay stable in that larger album. 

I've completed this 2012 album just in time.  We just booked our next trip for later this winter, and we can hardly think of anything else right now. I wish there was a way to bottle the high that comes with these happy moments! 

Hope you all enjoy this month's posts on the Counterfeit Kit blog and have a great month!

Sunday, December 2, 2012

Using My Fresh Starts Page Kit

Today I'm kicking off December's guest posts on the Counterfeit Kit blog.  All the Master Forgers and friends will be posting page kits and inspiration to help you wrap up your own 2012 projects.

Today's post shows my Fresh Starts page kit.  I just wanted to show a page today that I completed with that kit and a sketch from Valerie Salmon's Sketch 104 at Got Sketch (posted on December 3, 2011).  It's a sketch that used a 5x7 photo, and I played with it to make it work for my own 8x10 page that did not include a photo:


I printed several 8x10 photos for this album, and I didn't always have something to put on the other side of the page protector.  This was just a chance to play with pretty paper and add some fun journaling on an empty space.

Tomorrow I'll post the rest of my completed pages and my full vacation album.  I'm so happy to have this project finished!


I'd like to take the opportunity to wish everyone a Happy December! I'll be following along with everyone else's posts this month and look forward to all the Fresh Starts that January 2013 will bring.

Thursday, October 25, 2012

Thursday Tried and True Pin: A 1-Page Sketch

My tried-and-true pin for this week is a sketch.  It was perfect for some pictures from our vacation, another page using my Counterfeit Kit.


This sketch came from Scrap That Baby. I was surprised to see the content of that blog (all about scrapping kids under 4-years old), since the 3 pictures I had used for my page were actually baby pictures, too.  That might not be quite as much of a coincidence if you usually do kid pages, but I rarely have pictures or stories of babies. Just a happy coincidence, I guess.

And here's my page. Sorry for the white box faces - need to keep baby private, since he's not mine :). We took this vacation with my friends from college, and baby is the newest, cutest addition to the group. We just haven't had a lot of kids within our group, so the baby was passed around and squeezed and cuddled quite a bit.


Finally used the stars and buttons from my September kit, along with some other Jillibean circles and letters.  The woodgrain paper is from my kit, and the other Simple Stories and Jillibean papers are scraps from previous kit months. I inked the edges of the circles with red, yellow and blue inks but then topped those colors with a brown ink so they weren't so bright.  The red dots are Want2Scrap, and I've been using them like Frank's Red Hot Sauce lately.
So, another Pinterest success story for me! Want to follow?
Follow Me on Pinterest

Wednesday, October 24, 2012

More Kit Pages - Summer Vacation Pages

I mentioned yesterday that there may be some new eyes here in the audience. So in case any of you haven't heard, the Counterfeit Kit Challenge Blog is looking for new Master Forgers

If you're interested in learning more, click here to see the announcement.  It is a lot of fun, and I'm looking forward to the inspiration that comes when new people, new projects and new ideas are added to the team!

Today I have more pages made with this month's Counterfeit Kit.  These are all from our summer trip to the Finger Lakes in New York:

I mentioned yesterday that I ran out of paper for my kit this month.  So I added in some scraps from previous kits to do this quick page. I made the "hit the road" tag with an unuse stamp I have had forever. Glad I thought to finally use it!
The end of my one sheet of paper that inspired my kit this month - that striped paper is an older American Crafts paper, and I love how it has so many colors I wouldn't normally tie together.  That allowed me to get away with pink buttons, red hearts, yellow/green enamel dots and turquoise cardstock. I think :). It's a real hodge podge of colors, not my usual style, but I loved this picture (I know it doesn't look like much here - I cut out a friends face and it looks pretty dark, but the actual picture is much nicer), and didn't need much journaling.
Another page that didn't need much journaling. Used some scraps from my kit for the flags and added in the Amy Tangerine stuff like I mentioned yesterday. When I was done with the page, I didn't like all that wide-open black space on the page. Since it was a Coordinations cardstock with a pink core, I decided I should let some pink show through. So I scored random lines around the page from the back and then lightly sanded the lines to let the pink appear.  It's easier to see the pink in person. I liked that it just sort of filled the space without having to add more papers or embellishments.
That's it for today.  I have several more pages to show this week, so stay tuned!

Tuesday, October 23, 2012

October Counterfeit Kit Challenge #2

First, I'd like to welcome any new readers and followers!  We had a 2Peas thread last week for people looking for new blogs to follow, and I posted a link to this blog.  And then I didn't update for 5 days - oops!  That's not very inviting, is it? But I found some other great blogs to follow and still need to go back to the thread and check out a few more. 

Yesterday I did not post my Challenge #2 (to take a photo of a project in a new or unique way) with the rest of the Master Forgers, because my entry is a bit of a stretch for the guidelines.  Rather than taking a picture, I scanned several pages to post this week. 
 
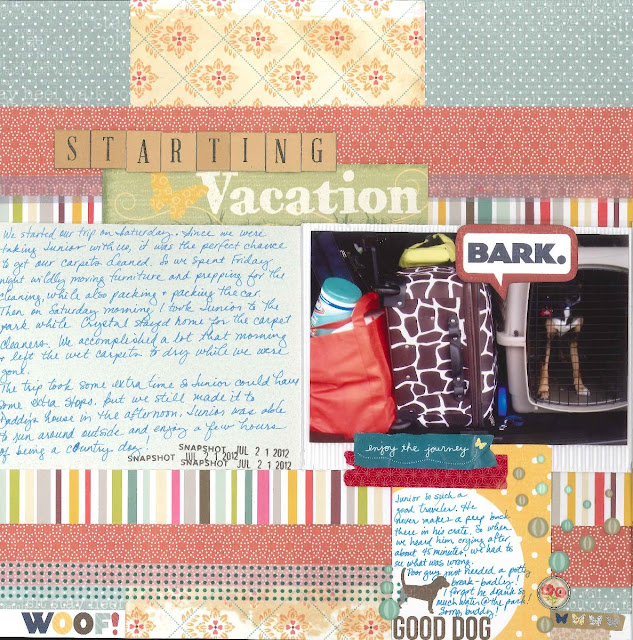
Does anyone remember my "Romney the dog" comment?  This is the picture that sparked that little family joke.  Junior's crate was wedged pretty tightly into the car for our summer vacation. He barely fit and was nearly relegated to the roof (no we would never really do that). We are not - I should say CRYSTAL is not - what could be called "light packers."

                          
I posted these two pages earlier this month.  Just wanted to show the scanned-version.

It's not a new or unique idea to scan pages, but I haven't done it for awhile. I do not claim to be a great photographer, but the time of year really gets in the way of taking layout photos at all.  The summer is firmly planted in the past around here, which means I now leave for work in the dark, and soon it will be completely dark by the time I get home, too.  That doesn't leave many options for nice, bright project pictures.  So I thought it might be a good time to talk about how I scan projects to get better page pictures on the blog.

Last year I read this article about using Paint to stitch scans together.  I do not have any fancy software to stitch scans or edit photos, so the Paint option was right up my alley.  Paint is a free program that comes on most desktop computers, which met my minimal-technology capabilities.  I used the instructions in the article, combined with some trial and error for the version on my own computers, and ended up with a method that works well for me.  In case it helps anyone else, here's what I do:

  • I scan my layouts on a copier and can scan up to 11x17. If you only have access to 8 1/2 x 11, that's fine, you'll just need to scan your page in more sections in order to get it all on the glass.  With 11x17, I am able to do just 2 scans and stitch in one place.
  • Consult your own scanner's instructions to determine how to access your scans.  In my case, my scans are sent to my email as a pdf.  I open that pdf, save as, change the file type to jpeg, and then save.  I then end up with each page saved as its own jpeg image.
  • I open the first image to work with.  I have a general order I use for editing. 
    (1) I flip/rotate the image as needed.
    (2) Then I select Stretch/Skew and reduce the image by 50%. That step may not be necessary for you; When I do this process on my laptop, that version of Paint allows me to View, Zoom, and then select a smaller size like 25% to view my whole mat.  My work computer doesn't give me that option, so I have to reduce the image size in order to easily work with the image.  It also makes the image a manageable size to upload to my blog and other sites.
    (3) I select (ctrl+A) the full image and then move it as needed to remove space from the left and top of the image I want to keep. Once it's in a good place, then
    (4) I make sure there is some white mat space below and to the right of my image, so when I paste the second scan onto this image, it will have some space on the mat.
    (5) Now I save the image but leave it open. 
    (6) And then open my second scan. Usually I'm just trying to use this piece to obtain the bottom inch or two of my page, but I look for a good place to make that cut - maybe the top of an element or something with a line that helps me mask the stitch location.
    (7) Repeat steps 1-3 with the second scanned image.  Then I either select all (ctrl+A) or use the select tool and grab the piece I want, and copy the selection.
    (8) Go back to the original image and paste the second image.
    (9) Drag the image into place so it blends with your first image. Once you have it in place, click elsewhere on the mat to set your new image. (Note: Don't click off of the image until you are happy with its placement. If you do it by accident, go to the menu and click Edit, Undo, and try to paste again).
    (10) Go to the leftover white mat space on the right and bottom of your image and reduce it.  If you don't do this step, the white space will be saved with your image.
    (11) Save your new image!
    (12) Sometimes I stitch a two-page layout into one image. In that case, I just repeat the process until I'm happy with the final image.
I know it's not fancy, but it works for me! And now that I have the hang of it, it really only takes a couple of extra minutes while I'm putting a post together.  I won't use it all the time, but it's a good option to have for the next few, very dark months to come. 

One last page for today.  My kit for October is running on fumes, with just enough for our Challenge #3 later this month.  I had to add in some paper and looked for more options with pink.  I happened to find the Michael's Recollections brand of an Amy Tangerine line when it was on clearance for $5. I decided to pick it up just for the vellum and cut-outs included in the stack, but the paper ended up being perfect to mix with some of my kit for some additional vacation pages like this one:

See where I stitched it? About half way down the page. I should have just stitched the bottom couple of inches to avoid the dark spot, but I was in a hurry and didn't notice how dark that section was.  I'll live with it :).
I'll pick up the pace around here and be back every day this week with more pages for this month.  Thanks for visiting!

Monday, October 15, 2012

October Counterfeit Kit Challenge #1: Quilt Inspiration

Hi Everyone!

Today is my first day back to work. Bleh!  I really turned a corner last week and feel quite a lot better now, and I've been a productive little scrapper over the past few days.  But now it's back to reality, and again I say, bleh!

Before I get to the challenge, I want to make sure everyone sees that the Counterfeit Kit Challenge is looking for new Master Forgers!  In case you didn't see the post, check here for all the details.  When the announcement for new team members was posted, I was reminded of how I felt when I joined the group last year.  It has definitely lived up to the excitement, and I can't wait to see some new faces in the group soon!

OK.  So onto business.  Today we're showing our Counterfeit Kit projects for Challenge #1 - to let quilts inspire a page. 

I recently noticed this paper from Basic Grey Clippings and used it as inspiration for my project.
Here is my project. I cut 1" squares from all the papers in my kit and used them to make some simple square-pattern
borders throughout my pages.  I used a long chain on the left, a short chain behind the title, and another piece
behind the journaling on the second page. 

I also used this red paper from my kit. It has been in my stash for a long time, and I not
quilt-like circular pattern to it, so I was glad to use it for this challenge.

The colorful "Woof" came from the paper title strip. It was too cute to not put to use :). The kraft stripe is another paper title strip put to good use.  The large quote card is hiding a big hole in that sheet of paper.  I didn't have a plan as I put this page together, so sometimes I had to improvise and find ways to make it all come together. 


If you complete a project of your own, be sure to add it to the October Mr. Linky at the Counterfeit Kit blog.  Have a great week!