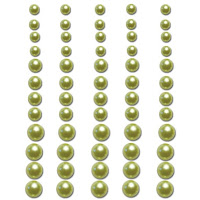
This month's Counterfeit Kit Challenge inspiration kit includes these pretty pearls from Queen and Co.
I only wanted to use items I had on hand, so I went searching through my stash for flat-backed, dome-shaped things - pretty specific, and not much to be had. But, what I did find was a packet of googlie eyes.
Why on earth did I have - and hang onto - a variety pack of googlie eyes?!
 |
| Here are some of the larger size eyes, after 2 layers of Martha Stewart pearl paint. |
 |
| The Martha paints are relatively new and add some fun colors and finishes among the little bottles of acrylic paints that you typically find at the craft store. |
A couple of tips that made the painting process on these slippery little suckers a little easier:
--I painted a line on the waxed paper and then put the eyes on the paint to help hold them in place.
--I used a little paint brush and sort of dabbed and swirled the paint onto the eyes, to get them coated without lots of brush strokes.
--The second coat just helped to fill in anyplace I missed the first time around. If you're more careful, one coat could be enough.
Some other ideas:
 |
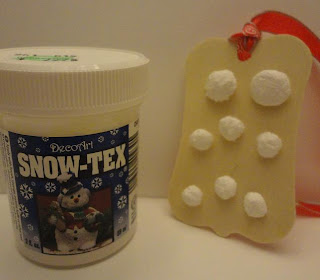
| I used some faux snow to make some snow pearls. Rough texture, but they would make cute snowballs or ice cream scoops! |
 |
| And I made some sand pearls with this Mudpuddles mixture. I'll save them for a summer beach page. Or maybe they look like a sheet of cookies?! |
 |
| These ones are not mine - I found this tutorial from The Girls Next Door that shows how to make pearls from clay. It's a lot more involved, but they look stunning! Maybe you stampers have some other ideas of how to use perfect pearls, alcohol inks, or some other supplies? |
If you come up with your own way to create one of these domed shapes, add your link in a comment below. Like I said - don't do this one for the cost savings, do it for the joy of making your own!
Here are a couple of projects where I've used my homemade pearls this month. And I have a few set aside for some in-progress cards:
Thanks for looking!


Your pearls may not have saved you any money, but they've helped you *use* your supplies and given you creative satisfaction - that's *priceless*!
ReplyDeleteThanks for sharing your experiments Rebecca.
Great ideas - and I'm with you on the fun of playing with our stash just to see what we can come up with. I've never seen that Mudpuddles product but it gives a great effect too!
ReplyDeleteWhat a clever idea! That is really thinking outside of the box!
ReplyDeleteBethany
what a great idea!!! tfs!!!
ReplyDeleteGreat idea and a good way to use what you have!
ReplyDeleteVery cool!!! Great ideas!! :)
ReplyDeleteWhat a great idea for those leftover googly eyes!!!
ReplyDeleteI really like the Martha Stewart paint ones. Great idea!
ReplyDeleteThat is a great idea.
ReplyDeleteI wonder if glimmer mist would work? And did you try a light sand first to take the shine off?
ReplyDeleteLook at this cool YT video done by a friend of mine. She made pearls from hot glue. Love your blog. I need to try some of the things you suggested.
ReplyDeletehttp://www.youtube.com/watch?v=Ts2t-UojWB8
Clever idea! Very creative. Becky x
ReplyDeleteWhat a great "make your own" idea!
ReplyDelete