Monday, October 31, 2011

Jillibean Soup Pages

Coming off a a great weekend of scrapping - 18 hours of cropping at Red Letter Journals in Grove City, OH and 8 pages completed. Well, mostly completed.

Wait...back up....did she say 8 pages?
Not 18 or 28....8?!?!

What on earth was I doing??? I feel like I was working the whole time, but with all the breaks to shop and eat and talk and win prizes....I just didn't end up with a lot of pages. And they're not even all totally completed - I still need to print some pictures and a few other odds and ends. Oh well, it was fun!

I also did a make-and-take hosted by Jill Yegerlehner of Jillibean Soup - so nice and so helpful! We did a tag project with the new Hearty Barley line. I made three pages with Jillibean pieces and repurposed my make-and-take tag into a journaling block on one of them:


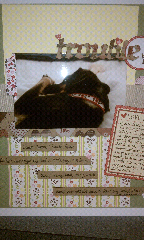
Used pieces from Hearty Barley and Blossom Soup. I made my own "chipboard" title, with four layers of the word glued together with the top later of pattern paper. 
Have you seen this commercial, with the dog worrying over his bone? That could totally be Junior! 


Again used pieces from Hearty Barley and Blossom Soup. 
I had some shiny bright red ribbon I wanted to use, from an event at my new job, but it was
too bright and shiny for this page.  So, I stuck a piece of vellum on top - toned it down a lot!
Also, I scraplifted a page from this month's Scrapbooks Etc. for this one. 
Sorry, I don't have the mag here with me right now - I'll add that info later tonight.

I think this is all Hearty Barley, except the background piece - I think that is Cosmo Cricket?
I used the make-and-take tag, moved the pieces from it around, and turned it into my journaling block.
I also used Shimelle's Scrapbook Page Starter for this one - so thanks to Shimelle for some inspiration :).
 
I'm working on getting my November Counterfeit Kit together this week.  If you'd like to use up some stash, start off a new month and play along with us at the CKCB.

Have a great week!
 
Rebecca

Saturday, October 29, 2011

Happy weekend!

Just a quick hello from our local scrapbook store, Red Letter Journals. I'm blazing through pages (yea, right) and having a great weekend. Just had a card class with Jill from Jillibean Soup, too. I'm so close to my goal of being caught up on our album. Midnight is going to be here too quickly, though!
More to come once I get some sleep and recover!

Thursday, October 27, 2011

Counterfeit Kit Challenge Blog Hop *and Get Picky, too!*

It's time for October's Master Forger hop!  If you're hopping, you likely came from Milissa. If you get lost along the way, the full list of stops is on the Counterfeit Kit blog.

Edited to add: This morning I forgot to also link this project to the Get Picky 1st Birthday Sketch 13 Challenge, so here it is now.  I came across this fun group of bloggers this month via Keri, our October Guest Designer at Counterfeit Kit.  Thanks, Keri! I used the sketch as inspiration rather than roadmap, but it was a great starting point for my page.

The theme for the CKC hop is to alter some stickers and use them in an unusual way on a project.

I had a pack of layered stickers in my October kit. I didn't take a before picture, but they had little-girl themed sayings on them, and I was never going to have an occasion to use them.

So I took off the top layer of each sticker, coated them with glitter to cover the writing, and then used them to hold some short journaling strips.  I cut the journaling strips from a bigger sticker, too. 


The page is about leaving my job earlier this year. I hadn't changed employers for 10 years -
I didn't realize how mentallly/emotionally draining the process would be.
Still feel like I'm getting over it sometimes! "Sweet goodbye" could be taken several different ways,
but that story is better told in some hidden journaling :).


My sticker stacks, repurposed as journaling blocks.

I cut the circle and the title multiple times and stacked them to make chipboard pieces.
Now that I've learned this trick, I'm going to use it all the time.


Thanks for looking! The next stop is Susanne.  And don't forget to go back to the CKCB blog for all the info on this month's prize from Momenta!

Sunday, October 23, 2011

Layers on Layers on Layers

Here's my take on the Counterfeit Kit Challenge #3 for the month: to use layers in a project.


My pages are from my niece's baby shower. My siblings collectively have 5 boys and 2 girls, so we're a bit boy-heavy in the count. So it was extra nice to hear one of my nieces was having a girl. Now I'm a great aunt - who has yet to meet baby Vera, who's several months old now, but I hope to see her soon!
  All the layers:

Paper:  I used an Allison Davis sketch, so layering papers was part of the deal. As an aside....I took an AD sketch support class last summer, and it was such a motivator! It really got me into/back into blogging, scrapping, everything. 

Stickers: I layered stickers on vellum, stickers on photos and  bling on stickers to make the embellishments.

Pearls: The flower paper was already layered with glitter and embossing, but I added my own homemade pearls as flower centers, too.

Title Letters: I've read that you can make your own chipboard by gluing layers of cardstock.  I finally tried it - why did I wait so long?!  I had no idea how easy it is and how good it looks, and I'll never have a flat title again.  I cut "girl" 5 times (3 or 4 would have been plenty), with 4 from kraftstock and the top layer from a glitterstock. The layers of small letters were easy to glue with a zig glue pen. 


Everything came from my October kits. When I started the month I had no idea how useful my purple add-on kit would be! I can't think of a time when I've used so much (or any?) purple like I have this month.


Now please go take the challenge, layer something on your own project and link it on the CKC blog. Thanks for looking!

P.S. And don't forget, Momenta is the October prize sponsor at CKCB. Get the details here.

Thursday, October 20, 2011

Make-Your-Own Pearls Experiment

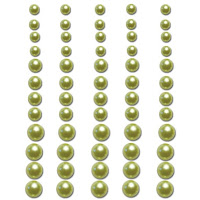
This month's  Counterfeit Kit Challenge inspiration kit includes these pretty pearls from Queen and Co. 

For the record, they're inexpensive (I found them online for less than $2/pack) in a range of colors.  But, I don't have any of them. So I thought I'd experiment with some ways to counterfeit my own pearl-like embellishments.

I only wanted to use items I had on hand, so I went searching through my stash for flat-backed, dome-shaped things - pretty specific, and not much to be had.  But, what I did find was a packet of googlie eyes.
Why on earth did I have - and hang onto - a variety pack of googlie eyes?!

Here are some of the larger size eyes,
after 2 layers of Martha Stewart pearl paint. 

The Martha paints are relatively new and add some fun colors
and finishes among the little bottles of acrylic paints
that you typically find at the craft store.

A couple of tips that made the painting process on these slippery little suckers a little easier:

--I painted a line on the waxed paper and then put the eyes on the paint to help hold them in place.
--I used a little paint brush and sort of dabbed and swirled the paint onto the eyes, to get them coated without lots of brush strokes.
--The second coat just helped to fill in anyplace I missed the first time around.  If you're more careful, one coat could be enough.

Some other ideas:


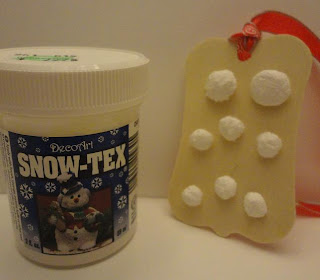
I used some faux snow to make some snow pearls.
Rough texture, but they would make cute
snowballs or ice cream scoops!

And I made some sand pearls with this Mudpuddles mixture.
I'll save them for a summer beach page.
Or maybe they look like a sheet of cookies?!
These ones are not mine - I found this tutorial from The Girls Next Door
that shows how to make pearls from clay. It's a lot more involved,
but they look stunning! Maybe you stampers
have some other ideas of how to use perfect pearls,
alcohol inks, or some other supplies?


If you come up with your own way to create one of these domed shapes, add your link in a comment below.  Like I said - don't do this one for the cost savings, do it for the joy of making your own!

Here are a couple of projects where I've used my homemade pearls this month. And I have a few set aside for some in-progress cards: 

Thanks for looking!

Saturday, October 15, 2011

Candy Challenge: Using Some $1 Stamps and Inks

I really enjoyed last months' Counterfeit Kit Challenges which focused on stamping. The blog hops at the end of the month were like taking some stamping classes, and I look forward to using some of those techniques.

Now, let's make this clear: I am not a stamper. Heaven help me if I started a new collection in another budget sinking hobby. But I have collected a few novice supplies - some dollar stamps (they're just so cute!) and ink pads, acrylic blocks and a bottle of clear UTEE. But otherwise I'm pretty limited - no embossing powders, Copics, fancy inks or "quality" stamp sets.

But I went looking for a way to use my stamp stash for this month's Candy Challenge anyway, and here's what I found. When I made my tealight last month, I learned that stamping on vellum is fun. The ink stays wet long enough for UTEE to stick to it.  That means the clear UTEE takes on the colors of the ink, giving lots of possibilities for colors and variety for someone with only basic supplies on hand.


I believe the candy stamp came from the $1 bin at Joanns. It reminded me of tootsie roll flavors, love the orange ones! 
Other supplies: UTEE, Vellum, Variety of inks, Heat gun

Stamp one image on vellum.

Coat the wet image with UTEE and remove any stray flakes.
Heat to a shine. I heat from underneath, so I can watch the color change.


Let cool and then proceed with the next stamped image.
I ran my vellum through my Xyron to get the good edge-to-edge adhesive to the card.


Next time I shop I need to put vellum on the list. It's something I haven't used in quite awhile, and my stash is depleting. Now that I know these new tricks, I see myself using it a lot more often.

If you haven't already, visit the Counterfeit Kit Challenge blog to take the candy challenge, and read more about this month's prize pack from Momenta. Good luck, and thanks for looking!

Now if you'll excuse me, I'm off to find some orange tootsie rolls!

Sunday, October 9, 2011

Messy

Another quick layout from my kit this month.

I used some Cosmo Cricut from my kit and realized the colors were a great match to some leftover WRMK's Furrever friends.  So I used a mix of both.
 

Sticky Pretties

I was so excited to see that this month's Counterfeit Kit Challenge prize sponsor is Momenta.  I haven't yet tried Momenta's Design Your Own stickers, but I'm always up for a unique new sticker, so I'm sure I'll try them.

Earlier this summer we went to my 20-year high school reunion and stayed at my dad's house. On our last day of the trip, my dad asked me to go through my old room and decide what to keep and what could be donated/thrown away. Much to my dad's dismay, I came home with just one small box of treasures, the rest designated for greener pastures of his choosing.

While going through all the college books, dolls, old clothes and collected papers, I came across the best treasure, something I thought was long gone: my sticker book!


Did you collect stickers?


Apparently I really liked holographic and puffy stickers.
 Did you have a sticker store? I used to scrape together whatever change I could find and couldn't wait to get to the mall to go to the sticker store. It was just rows and rows of stickers on rolls -- holographic, puffy, scratch-and-sniff. I loved it all!


Rainbows were big. Rainbows and unicorns on the same sticker - that's sticker gold!  I'm resisting the urge to open the facing page to see if any of the smells are still trapped in there.
 I believe this album to be my only remaining prehistoric evidence of scrapbooking. I used to collect stationary paper, too, but I'm sure I used it all in writing to far-away pen pals. For those of you that might be less prehistoric than me, a "pen pal" was someone you exchanged handwritten letters (and maybe some stickers as a bonus) with through the USPS. There were no Skypes, no chat features, no instant messangers, so it took time to develop a good pen pal.  I doubt many 10 year olds with fascinations for rainbows and unicorns know what a pen pal is anymore.


People always told me, be careful what you do, don't go around breakin young girls' hearts.....
 As for my sticker book, it made the cut to take up space in my keepsake box. I might take some better pictures and eventually throw it away, but for now I'll enjoy the memories from the real thing.

Here's the page I made for the occasion, using items from my October Kit. 

I scraplifted a layout but I can't find where it came from.  I had it pinned on Pinterest as a project titled "Totally Happy" on the Jillibean Soup blog, but I can't find the original layout on the blog.  So, if you recognize it, just know I tried to give some credit :).

I made my own foam letters for the title and counterfeited the glittered Thickers from the inspiration kit.  I found that the best way to glitter the foam was to run it through my Xyron X, go around each letter to help release it from the edges and then pour the glitter over the adhesive side.  Just remember to put the adhesive on the right side of the letter.


I  added some purple Stickles to some plain stickers to make them a little prettier.  I don't know that I've ever had an occassion to use purple on a layout, so I had to take advantage of it.


I used a few of my homemade pearls, too. I'll show how I made them later this week.

Stay sticky, my friends.
Thanks for looking!

Thursday, October 6, 2011

October Counterfeit Kit Challenge

It's October, and that means.....it's time to get a cold!  No, no, wait....that's not it.  I mean, I got the cold, but that's not the big excitement.  October means I'm officially a Master Forger!  And it's time to reveal our Counterfeit Kits for the month.

The inspiration kit is from Little Red Scrapbook, September 2010:


And here is my kit for the month:

Top Left: My full kit with some extra stickers to use this month.

Top Right: The papers are a hodge podge of Cosmo Cricket, GCD Studios, MME, DCWV and Basic Grey.

Bottom Left: In place of the Thickers in the original kit, I counterfeited my own.  I'll show you how I did it and use my sample word later this week. 
Bottom Right: I cut some tag shapes to match the ones in the kit, but I haven't decided how to decorate them yet.  The round blobs to the right are an experiment.  The googlie eyes are not for Halloween :).  I don't have any of those pretty pearls from Queen and Co. in the inspiration kit, so I'm working on a counterfeit.  I'll let you know how the experiments work out.

__________________________________________________________________________________

As I tried to put together my original kit, I couldn't find any scallop-edged papers to use in place of the piece in the inspiration kit.  What I did find was a bright purple floral paper, and that inspired me to put together this purple-themed add on kit:


All the papers are SEI and American Crafts.  I threw in some extra stickers (probably to alter) and some purple flowers. 

Hope you are inspired to play along with a kit of your own!